
Installation
1 - Downloading GuimicK
Go to the home page and click on the "Download" button

You will be asked to execute or save the file. Choose to save the file and wait until the download is complete.
Yes, the file has a very strange name (like f7e1b3_f73c4519aac44b17ba16b7510645beeb.zip).
2 - Running the installer
Once the download completed, open the zip archive containing the setup file and execute it.
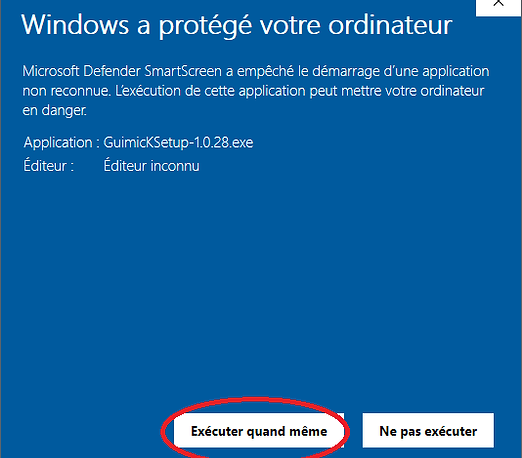
The installer is not signed and certified by Microsoft, so it will display a warning dialog:

Click on the "More information" link. More information about the issue will appear with a "Execute anyway" button.
Click on the "Execute anyway" button.
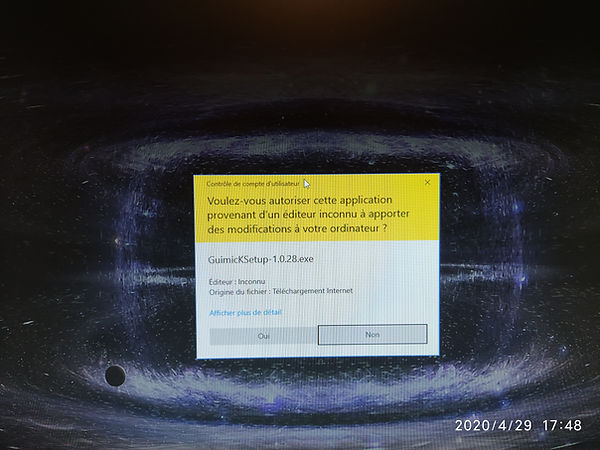
Before executing the installer, there will be one last warning message from Windows : the installation process needs administrator priviledges to install GuimicK on your machine. Click "Yes" to run the installer.
The installer should now execute normally. Once installation is finished, you can run GuimicK!
Using GuimicK
GuimicK should now be accessible from your Windows start menu :

Run GuimicK.
GuimicK needs administrator rights to run properly, so Windows will ask you if you wish to grant those permissions to GuimicK. You must click "Yes" to continue.

1 - Adding a new task

Now you are on GuimicK main interface.
As we are starting it for the first time, there are no tasks configured. Let's add a "Check Hard Drive" task :
Now you have a task on your task list. Your main interface now shows the "Check Hard Drive" task newly created :

2 - Editing a task
You have now a task, but it is not configured yet. In order to do this, you need to edit the task. This can be done by double clicking on it. This will open the task dialog :

There you can choose the rename the task and select which drive you want to be verified. In this case, the task has been renamed to "Check data HD" and the drive G:\ has been selected.
This is it! Now you have a task on your task list and you now how to configure it.
3 - Running the task list for testing
So we have a configured task in our test list, but it is not scheduled yet. And before scheduling it, we might want to run it first to see if it runs well.
The option to run current task list can be found on the "Task tool" menu :

This will open the Run dialog. Click on the "Run" button to start running the task list.
Depending on your hard drive, this can take several minutes...

Once the task list has finished being executed, you should see the report about the tasks that ran and their status :
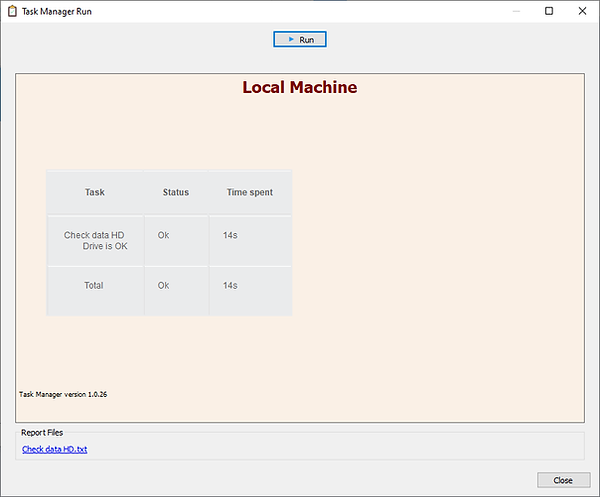
The report shows a resumed description of the tasks that ran, their status and basic information about it.
More detailed information is usually available in separate report files. Here in the "Check data HD.txt" file available on the "Report files" section of the report.
4 - Scheduling the task list to be ran periodically
The task scheduling options are available on the "Task Tool" menu :

Click on it.
As we haven't saved our task list so far, we need to do it now. Click on "Yes" and choose a filename for your task list.

Now the Schedule dialog should open.
Select when you wish to run your task list. Once you have chosen your schedule options, click on "OK" to have them registered.

Once you do that, you will be prompted with a Windows dialog asking for you credentials.
Your task list will be ran on your behalf by Windows, and as a security measure it asks you your user credentials. Fill your username, password and click "OK" :

That's it!
Your task list will be ran at the time you scheduled it to do so!
5 - Checking the task list run report
So, your task list is scheduled to run and it has already run. Where is the report of the last run?
If you followed previous steps, you haven't configured where you want the report to be created, so it will be created in your Documents folder :

Open "GuimicK Report" folder and the "report.html" file inside it to see the report :

The report is the same as seen from the "Run" dialog. All detailed data is available in separate files in the same folder.
You can change where the report is being created, the Settings dialog is available through the "Settings->General" menu :

If you choose to change the report folder, don't forget to save your changes.
That's it, now you know how to use GuimicK!